Protect APIs on Azure API Management with ThunderID
This guide explains how to secure your APIs at the Azure API Management gateway layer using tokens issued by ThunderID. By retrieving public signing keys from the ThunderID JWKS endpoint, Azure APIM cryptographically verifies every incoming token at the edge before forwarding authorized requests to your backend services.
The guide covers two core integration approaches available in Azure APIM:
- Token Validation: Configure Azure APIM to validate incoming JWTs issued by ThunderID using the
validate-jwtpolicy, ensuring only authenticated requests access your APIs. - Scope-Based Authorization: Leverage ThunderID's RBAC capabilities to enforce strict, Azure APIM-driven access control policies on upstream APIs.
Prerequisites
Before you begin, ensure you have the following:
- A running ThunderID installation. Follow Get ThunderID for download, setup, and start commands.
- An Azure API Management service instance.
- A backend API imported or created in Azure APIM.
curlavailable in your terminal.- ngrok installed to expose ThunderID on a public URL.
Expose ThunderID on a Public URL
Azure API Management is a cloud-hosted service and cannot reach a ThunderID instance running on localhost. Expose ThunderID on a publicly accessible HTTPS URL before configuring Azure APIM.
ngrok provides a quick tunnel for local testing:
-
Sign up for a free ngrok account and follow the ngrok setup guide to install and authenticate the CLI.
-
Start a tunnel on ThunderID's default port:
ngrok http 8090 -
ngrok prints a forwarding URL:
Forwarding https://abc123.ngrok-free.app -> http://localhost:8090Use this URL as
<THUNDER_PUBLIC_URL>in the steps below.
The ngrok URL changes on every restart unless you have a reserved domain. If the URL changes, update the configuration below and the openid-config url in your Azure APIM validate-jwt policy.
Set the public URL in ThunderID's deployment.yaml:
server:
  hostname: "localhost"
  port: 8090
  public_url: "https://<THUNDER_PUBLIC_URL>"
Restart ThunderID after saving the change. Also update the Console callback URL to https://<THUNDER_PUBLIC_URL>/console.
Configure JWT Token Validation in Azure API Management
JWT authentication is the foundation of API security with Azure APIM and ThunderID. In this section, you register an application in ThunderID to obtain credentials, configure Azure APIM to validate tokens using the ThunderID JWKS endpoint, and verify that unauthenticated requests are rejected.
Configure ThunderID
Create an Application
- Sign in to the ThunderID Console at
https://<THUNDER_PUBLIC_URL>/console. - Navigate to Applications → New Application.
- Enter an Application name.
- Select Backend service as the application type.
- Click Create application.
- Note the Client ID and Client secret from the application details page.
Obtain an Access Token
Use the client credentials grant to request an access token:
curl --location 'https://<THUNDER_PUBLIC_URL>/oauth2/token' \
  --header 'Content-Type: application/x-www-form-urlencoded' \
  --data-urlencode 'grant_type=client_credentials' \
  --data-urlencode 'client_id=<CLIENT_ID>' \
  --data-urlencode 'client_secret=<CLIENT_SECRET>'
Save the returned access_token. You will use it in the Try It Out section.
Configure Azure APIM
Add JWT Validation Policy
Azure APIM enforces JWT validation through inbound policies. The validate-jwt policy fetches public keys from the ThunderID JWKS endpoint and verifies the signature on incoming tokens.
- In the Azure portal, navigate to your API Management service.
- Select APIs from the left menu, then select your API.
- Select the Design tab.
- Under Inbound processing, click the </> (policy editor) icon.
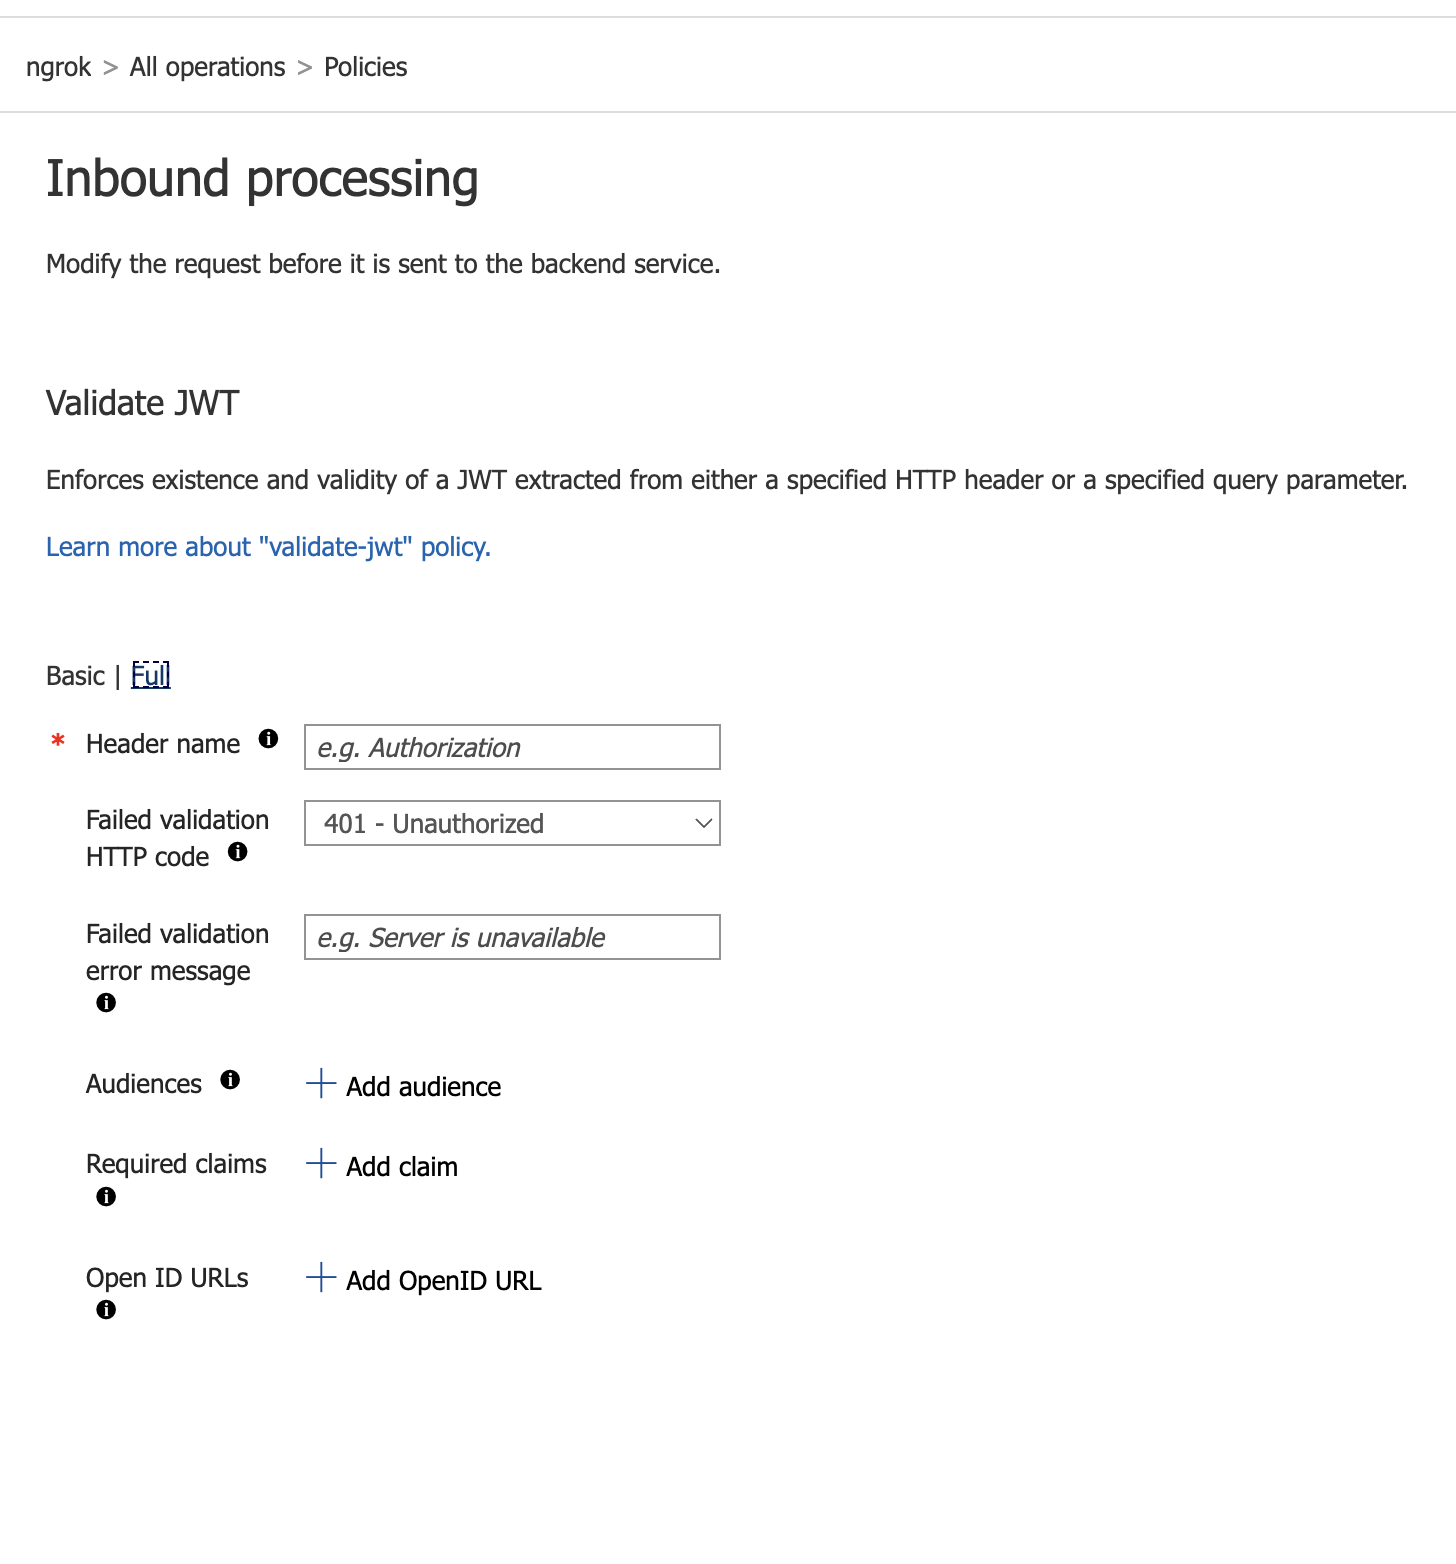
Policy configuration reference:
| Attribute | Value | Description |
|---|---|---|
header-name | Authorization | HTTP header that carries the Bearer token |
failed-validation-httpcode | 401 | HTTP status code returned when validation fails |
failed-validation-error-message | Unauthorized | Error message returned when validation fails |
url (openid-config) | https://<THUNDER_PUBLIC_URL>/.well-known/openid-configuration | ThunderID OpenID Connect discovery endpoint; Azure APIM uses it to resolve the JWKS URI and signing keys |
<audience> (optional) | https://api.example.com/bookings | Must match the identifier of the Resource Server created in ThunderID; Azure APIM rejects tokens whose aud claim does not contain this value |
- Add the
validate-jwtpolicy inside the<inbound>section: - Click Save.
<inbound>
  <base />
  <validate-jwt header-name="Authorization" failed-validation-httpcode="401" failed-validation-error-message="Unauthorized">
    <openid-config url="https://<THUNDER_PUBLIC_URL>/.well-known/openid-configuration" />
  </validate-jwt>
</inbound>
Azure APIM fetches the ThunderID OIDC Discovery endpoint to resolve the JWKS URI. It validates that both the issuer and jwks_uri in the discovery document match the configured ThunderID URL. Ensure public_url in deployment.yaml is set correctly: a mismatch causes the validate-jwt policy to fail on save.
Manage API Revisions
Revisions let you make non-breaking changes to an API and test them before making them live. Use a revision to apply and validate the JWT validation policy before it affects production traffic.
Create a Revision
- In the Azure portal, navigate to your API Management service.
- Select APIs, then select your API.
- Select the Revisions tab.
- Click + Add Revision.
- Enter a description such as
Add JWT validation policyand click Create.
Azure APIM creates the new revision and switches the editor context to it. The revision is not yet live.
Apply the Policy to the Revision
With the new revision active, open the Design tab and apply (or update) the validate-jwt policy as described in Add JWT Validation Policy. Click Save when done.
Test the Revision from the Azure Portal
- Select the Test tab.
- Choose an operation from the list.
- Under Headers, add:
- Name:
AuthorizationValue:Bearer <ACCESS_TOKEN> - Name:
Content-TypeValue:application/json
- Name:
- Click Send and verify the response code and body.
| Request | Expected response |
|---|---|
| With a valid ThunderID token | 200 OK |
| Without a token | 401 Unauthorized |
Publish the Revision
Once all tests pass, make the revision live:
- Select the Revisions tab.
- Find your revision, click ... → Make current.
- Optionally check Post to public change log to record the change.
- Click Make current.
All API traffic now flows through the updated JWT validation policy.
Try It Out
Request without a token, expect 401 Unauthorized:
curl --location 'https://<AZURE_APIM_GATEWAY_URL>/<API_PATH>' \
  --header 'Ocp-Apim-Subscription-Key: <SUBSCRIPTION_KEY>' \
  --header 'Content-Type: application/json'
Request with a valid ThunderID token, expect 200 OK:
curl --location 'https://<AZURE_APIM_GATEWAY_URL>/<API_PATH>' \
  --header 'Authorization: Bearer <ACCESS_TOKEN>' \
  --header 'Ocp-Apim-Subscription-Key: <SUBSCRIPTION_KEY>' \
  --header 'Content-Type: application/json'
If you see the following error when calling your API via the Azure APIM gateway URL:
{
  "statusCode": 401,
  "message": "Access denied due to missing subscription key. Make sure to include subscription key when making requests to an API."
}
Azure APIM enforces a subscription key requirement on APIs by default. You have two options:
-
Pass the key in the request: Add the
Ocp-Apim-Subscription-Keyheader. You can find your subscription key in the Subscriptions section of your Azure APIM service.curl --location 'https://<AZURE_APIM_GATEWAY_URL>/<API_PATH>' \
--header 'Authorization: Bearer <ACCESS_TOKEN>' \
--header 'Ocp-Apim-Subscription-Key: <SUBSCRIPTION_KEY>' \
--header 'Content-Type: application/json' -
** See the Azure APIM troubleshooting guide for additional help.
Configure Scope-Based Authorization in Azure API Management
JWT validation confirms that a token is valid and was issued by ThunderID. It does not control what the token holder is allowed to do. With the configuration from the previous section, Azure APIM accepts any valid ThunderID token regardless of the application or its assigned permissions.
Scope-based authorization adds a second layer of control. ThunderID embeds scopes in tokens based on the roles assigned to an application. The validate-jwt policy checks those scopes on every request and rejects tokens that do not carry the required permissions. This lets you enforce scope-based access control, for example,
restricting a write endpoint to tokens with item:write and a read endpoint to tokens with item:read, without changing the backend service.
The steps below build on the JWT validation configuration from the previous section. You will define a Resource Server, a Resource, and Actions in ThunderID to model your API permissions. Then bundle those permissions into a Role, assign the Role to your application, and update the Azure APIM policy to enforce scope validation.
Configure ThunderID
To get a token with scopes that protect your APIs, define a Resource Server with its Resources and Actions to model your API permissions. Bundle those permissions into a Role and assign that Role to your application. ThunderID then includes the corresponding scopes in every token issued for that application.
Create a Resource Server
A Resource Server represents your API in ThunderID. The Resource Server groups all resources and actions under a single identifier and acts as the audience for tokens issued to clients of that API. For a full reference, see Resource Servers.
Using the Console:
- Sign in to the ThunderID Console at
https://<THUNDER_PUBLIC_URL>/console. - Navigate to Resource servers → New Resource Server.
- Fill in the following fields:
- Name:
Booking API - Identifier:
https://api.example.com/bookings - Description:
Handles item operations - Delimiter:
:(colon)
- Name:
- Click Create.
- Note the Resource Server ID from the details page.
Create a Resource
A Resource represents a specific entity within the API, such as /api/items. Resources let you model your API surface so that permissions can be granted at a granular level.
Using the Console:
- Open the Booking API Resource Server.
- Go to the Resources tab and click New Resource.
- Fill in the following fields:
- Name:
Items - Handle:
item
- Name:
- Click Create.
Create Resource Actions
Actions define the operations allowed on a resource. Each action produces a scope in the format <resource-handle>:<action-handle>. ThunderID includes these scopes in tokens issued to applications that hold the corresponding role.
Using the Console:
- Under the Booking API Resource Server, open the Items resource.
- Go to the Actions tab and click New Action.
- Fill in the following fields:
- Name:
Write Item - Handle:
write - Description:
Permission to write an item
- Name:
- Click Create.
- Note the generated permission shown in the action details:
item:write.
Create a Role and Assign Permission
Roles bundle one or more permissions together. Assign roles to applications to control which scopes appear in their tokens.
Using the Console:
- Navigate to Roles → New Role.
- Fill in the following fields:
- Name:
Booking editor
- Name:
- Click Continue.
- Under Assign permissions, choose
item:write. - Click Continue.
Assign a Role to the Application
Assign the role to the application you created in the previous section. ThunderID includes the role's scopes in every token issued for that application.
Using the Console:
- Navigate to Applications and open your Backend Service application.
- Go to the Roles tab.
- Click Assign role, select Booking editor from the list, and confirm.
Configure Azure APIM
Update the validate-jwt policy to add a <required-claims> block. Azure APIM rejects tokens whose scope claim does not include the specified value.
- In the Azure portal, navigate to your API Management service.
- Select APIs, then select your API.
- Select the Design tab.
- Under Inbound processing, click the </> (policy editor) icon.
- Replace the existing
validate-jwtpolicy with the following:
<inbound>
<base />
<validate-jwt header-name="Authorization" failed-validation-httpcode="401" failed-validation-error-message="Unauthorized">
<openid-config url="https://<THUNDER_PUBLIC_URL>/.well-known/openid-configuration" />
<required-claims>
<claim name="scope" match="any" separator=" ">
<value>item:write</value>
</claim>
</required-claims>
</validate-jwt>
</inbound>
- Click Save.
Scope configuration reference:
| Attribute | Value | Description |
|---|---|---|
name | scope | JWT claim that stores scopes |
match | any | any: the token needs at least one matching value; all: the token must carry every listed value |
separator | (space) | Delimiter used to split the scope claim string into individual scope values |
<value> | item:write | Required scope value to access this operation |
Try It Out
Obtain an Access Token with the Required Scope
Request a token for the application that has the role assigned:
curl --location 'https://<THUNDER_PUBLIC_URL>/oauth2/token' \
--header 'Content-Type: application/x-www-form-urlencoded' \
--data-urlencode 'grant_type=client_credentials' \
--data-urlencode 'scope=item:write' \
--data-urlencode 'client_id=<CLIENT_ID>' \
--data-urlencode 'client_secret=<CLIENT_SECRET>'
The response confirms the scope is present:
{
"access_token": "<ACCESS_TOKEN>",
"token_type": "Bearer",
"expires_in": 3600,
"scope": "item:write"
}
Call the Protected API
With a token that has the required scope, expect 200 OK:
curl --location 'https://<AZURE_APIM_GATEWAY_URL>/<API_PATH>' \
  --header 'Authorization: Bearer <ACCESS_TOKEN>' \
  --header 'Ocp-Apim-Subscription-Key: <SUBSCRIPTION_KEY>' \
  --header 'Content-Type: application/json'
With a token missing the required scope, expect 401 Unauthorized:
curl --location 'https://<AZURE_APIM_GATEWAY_URL>/<API_PATH>' \
  --header 'Authorization: Bearer <TOKEN_WITHOUT_REQUIRED_SCOPE>' \
  --header 'Ocp-Apim-Subscription-Key: <SUBSCRIPTION_KEY>' \
  --header 'Content-Type: application/json'

